Showing posts with label In the Kitchen. Show all posts

Sunday, March 11, 2012

In the Kitchen: We All Scream For...

My Mouthwatering Masterpiece. 
...ICE CREAM! For my readers who have payed extra close attention to my previous posts, you'll remember that I've wanted an ice-cream maker for quite a while now. But, because it seemed a rather frivolous purchase, I couldn't bring myself to buy one. Lucky for me, my wonderful parents are regular readers and decided that an ice-cream maker just might make the perfect Christmas gift for me. (Thanks mommy and daddy! I'll repay you in ice cream soon!) Being the lazy thing that I am, I didn't get around to using it until a few weeks ago when I decided to emulate my favorite ice cream shop, Ici, and make one of my favorite flavors in the world: Earl Grey. I scoured the internet and happened upon this recipe from Mac & Cheese, which was a resource that I happily consulted and modified to suit my needs. The following post details my ice-cream making adventure in recipe form...don't worry, there will be lots of personal/witty commentary and photos to keep things lively and a little anecdotal tidbit at the end...so read and party on, Garth and Wayne. And, away we go:

Ingredients:
(makes about 1 quart––the maximum amount that my ice cream maker holds.)

1 cup whole milk
2 cups half & half
3/4 cup sugar
6 Earl Grey tea bags (Trader Joe's version works well)
5 egg yolks

Ingredients, minus egg yolks.
Directions (complete with my goofy commentary in italics and lots of photos):

1. Pour the milk, half & half and sugar into a medium-sized pot and heat on medium/hot until warm. Since I don't have a fancy candy thermometer or anything like that, I just used my (clean) finger to test the temperature. Remove from heat, place the tea bags in the mixture, cover and steep for one hour. I was a little worried about leaving warm milk out for so long, but it turned out fine for me, so just roll with it.

Pre-steeped mixture.
Post-steeped mixture.
2. Separate eggs if you haven't already and whisk the yolks together in a medium-sized bowl (should be large enough to hold the milk mixture. Rewarm the mixture and slowly pour it into the bowl with egg yolks, whisking constantly. Yeah, I don't have fancy kitchen equipment or even regular kitchen equipment. I had to substitute a fork for a whisk and a large pot for a medium-sized bowl. But, as Tim Gunn says, make it work!

Being a poor college student, I have no medium-sized bowls laying around.
Only one medium sized pot and one large sized pot, pictured above.
3. Return the milk and egg mixture to the pot, cook over medium heat. Use a spatula or wooden spoon to stir and scrap the bottom of the pan. This is your custard--it will be done when the back of the spatula/spoon. (If you're unsure, you can draw a line across the coated spatula/spoon with your finger. If it leaves a clean trail, it's done.) I was also a little nervous about this part, mainly because I fear salmonella like the plague. I waited until the custard 'coated the back of the spatula,' but it seemed so subjective, so I kept it on a little longer. I didn't know the finger trick until after I had made it. 

Obviously, not my kitchen. (Kinda wish it were.)
My photo ended up being not so good.
Credit: taste.com.au.
– Cool the mixture (Overnight for best results. This would also be a good time to freeze your freezer bowl if needed). I actually didn't know that the freezer bowl needed be frozen ahead of time until after I had made the custard. So I improvised, stuck the custard in the fridge for the night and put the freezer bowl in the freezer. Turns out, cooling custard overnight is a thing real cooks do. Awesome. 

Just in case you didn't know what a pot in a fridge looked like. 
– Freeze in ice cream maker according to your appliance's instructions. With my ice cream maker (Cuisinart ICE-21R), your freezer bowl needs to be pre-frozen for about 24 hours before you make the ice cream. Attach the freezer bowl to the base. Place the mixing paddle into the bowl, circle side up. Place lid on base and lock it into place. This turned out to be somewhat stressful for me because I was so worried about it turning out alright and I didn't want to be foiled by overlooking a detail. The manual said to put the custard in the freezer bowl asap, because the bowl would start to defrost. So I was running around my tiny kitchen like a mad-woman, frantically double-checking my instruction booklet to make sure I didn't miss a step.

And, here...we...go...
Nervously consulting the manual.
Ahhh, what is happening? 
– Turn your ice cream maker on and immediately pour the mixture in. Leave that noisy thing on for 20 minutes. This was seriously the most nerve-wracking thing the first time––I was so skeptical that it was gonna turn out like ice-cream. The second time I made this I had a lot of fun checking up on it every so often and watch the mixing paddle scrape the solids off side of the freezer bowl. I don't know why that was so entertaining. But I digress... 

Pouring...
Swirling, swirling, ever swirling.
Wilt thou ever becometh ice-cream?
It's working! It's working!
– At this point, your ice cream is finished and will have a soft-serve–like consistency. If you are anything like me, you will be jumping around your kitchen with a level of excitement only seen in kindergarten classroom. If you desire a more ice-cream–like texture, transfer the dessert to a container and store in freezer for a few hours or overnight, for best results. After that, you've got Ici-status Earl Grey ice-cream!
Straight out of the maker.
Soft-serve consistency.
Hello world. Look what I made! 
After a night in the freezer.
Despite my loquacious description of the process, it was surprisingly easy to make this recipe. Before this, my only other experience making ice-cream was with my dad when I was about six years old. We had a one of those old fashioned wooden churners you had to crank by hand, and one sweltering summer's day we made strawberry ice-cream in the backyard. (I would say it made me feel like Huck Finn or something, but his dad wasn't very nice. Mine is.) I remember my arms being so sore, but the ice-cream was so good, it felt as though I had earned it. And, even though compared to that, this experience this was ridiculously easy (to the point where it's dangerous for my waistline), I still got that feeling of satisfaction this time around.

So, making ice-cream, believe it or not, was kind of an empowering experience for me. Being able to make it all by myself and having it turn out that good was something to be proud of. The fact that it was just as good as or (dare I say it?) maybe even better than Ici's (no, blasphemy!)...well, that just put a big smile on my face. Look out for many more ice-cream making posts in the future!  

Wednesday, February 15, 2012

In the Kitchen: Zucchini Boats + Mashed Sweet Potato


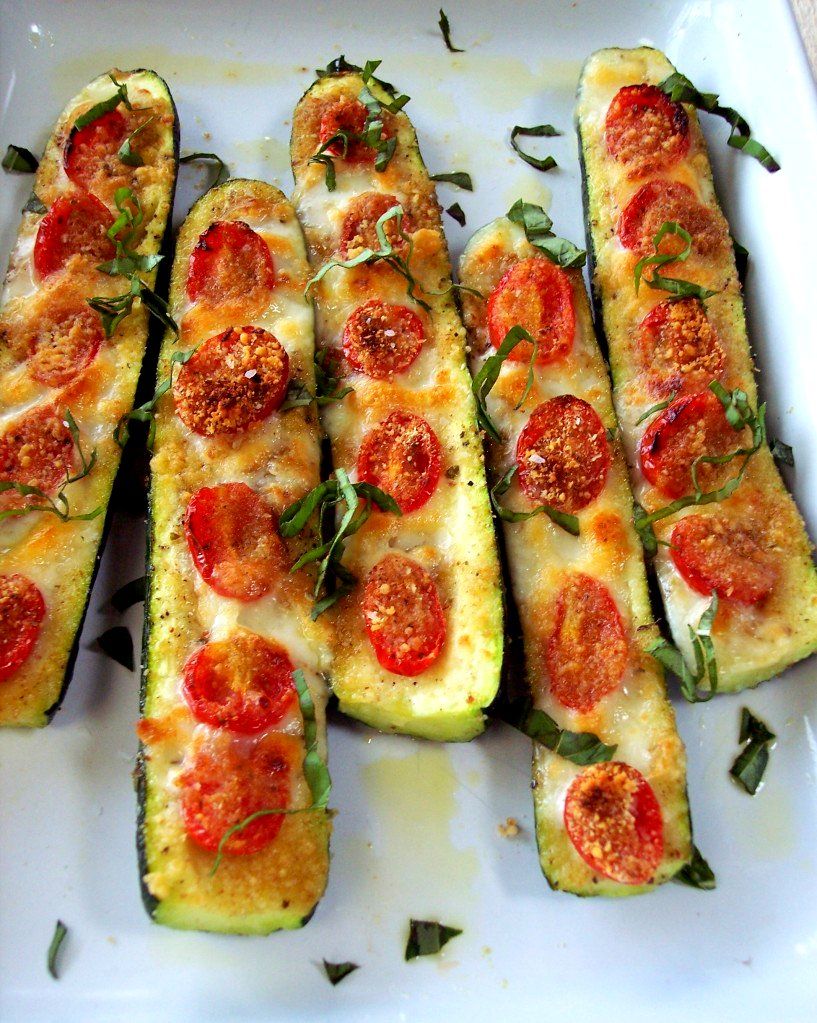
Close-up of my take on Zucchini Boats, made with garlic, grape tomatoes, mozzarella, parmesan and basil (for garnish).

So, things you've missed since I last posted: I'm cooking a lot more, and enjoying cooking a lot more; I'm on a weird veggie kick, since I'm trying to minimize meat in my diet; and I got a Pinterest, which has given me a lot of creative recipe ideas. Put these trends together and what do you get? ZUCCHINI BOATS!

Photo Credit: Proud Italian Cook
Here's the original recipe from Proud Italian Cook and above is a pretty picture from that page. I excluded bread crumbs, because I was lacking, but they probably would have added a nice little crunch to the texture. Also, make sure to make deep grooves in the zucchini beforehand, or else the tomatoes will sit on top, like mine did. Besides these little things, this was such an easy dish to make and the copious amount of garlic I used made the entire apartment continue to smell yummy for days afterwards. The grape tomatoes were packed with flavor and tasted so good after being roasted. And the mozzarella and parmesan cheeses lent the whole thing a bit of richness and texture, and provided the much needed unhealthy segment of the dish.

Photo Credit: Beau Gustafson, Mindi Shapiro Levine (Styling)

That same night Ben also made mashed sweet potatoes. I've been obsessing over sweet potatoes lately. Not only are they immensely delicious, but their high concentrations in several nutrients (dietary fiber, maganese, potassium, and Vitamins A, B6 and C) prompts some to call this a superfood. Anyways, Ben is a master at making this and it's so simple: boil the potatoes until soft, mash' em up, then mix in butter, milk, tiny bit of brown sugar, salt/pepper. ("And a lot of love," Ben is telling me, half–tongue-in-cheek, as usual). Anyways, it makes for a delicious, simple and filling dish –– highly recommended!

Lovely Sweet Potatoes, boiling away.
To end this post, I want to share a video that takes a bit of explanation. My latest obsession with sweet potatoes just happened to coincide with my recent discovery of this hilarious youtube comedian/absurdist/dj/German-immigrant/early-morning-investigator-of-American-idioms/ridiculous-guy, Flula Borg. (Here's my fangirl blog post about Flula on Briana + Her Fascinations). It just so happens that Flula helped bring my two obsessions together: I give you Flula's "Sweet Potato Casserole". Warning: this song is very catchy and may involuntary enter your brain at inopportune times.


Wednesday, September 14, 2011

In the Kitchen: PLT with Basil Mayo

Delicious, quick and easy: PLT with Basil Mayo.
PLT? Yes, you read that right. I have discovered my new favorite twist on the classic Bacon, Lettuce and Tomato sandwich using...prosciutto! Prosciutto is an Italian dry-cured ham, that has a strong and delicious flavor, and, though it can be a little pricey, I was able to find a cheap-o pack at Trader Joe's for about $5. Thankfully, using prosciutto as a substitute for bacon in this sandwich doesn't seem to compromise the spirit of the BLT. While it may not be any healthier than bacon, in terms of taste, you can hardly tell the difference between the two delicious meats. 


There is one way in which, for me, prosciutto trumps bacon in this sandwich––and that is in terms of its convenience. On my busy days, when I only have a one hour-long break between classes, I want to use the majority of that time to unwind, relax, to not think about the next thing I have to do. It is at these times, when I am at my tiredest and hungriest, that I haven't the time to spend cooking an elaborate lunch. Okay, I admit that frying up bacon can hardly be considered elaborate; nevertheless, I need every little bit of energy and time saved that I can get. (Plus, there are those dishes, and that lingering smell of bacon in my apartment that will tease me when I return, to consider.) So, prosciutto offers me a ready-made, slap-it-on-the-sandwich, unapologetically-lazy alternative to bacon for this sandwich, one that tastes good to boot. 


When I first made this sandwich, however, I wanted it to be extra special and extra delicious, so I did manage to put in just a little extra effort. I had tried Elmwood Cafe's BLT with Basil Mayonnaise, and though generally I'm not a huge fan of mayo, I thought the sauce added a tasty bit of freshness to their sandwich. Since I had mayo in the fridge and had just bought more basil than I knew what to do with, I decided to embrace my love for DIY and try to make it myself.


Cutting up basil. Someone buy me a food processor!
Finished basil mayo, with lemon juice. 
 I took a few basil leaves, cut them up as small as I could (these are the times when I wish I had a food processor). I added them to the mayo along with a bit of lemon juice to cut through my least favorite part of mayonnaise: its thick and creamy texture. And voila! I had recreated the Cafe's flavorful spread (albeit somewhat crudely), which gave my sandwich an little something special. And, of course, being the lazy cook that I am, I made enough so that I could have some leftover and save time in the future. Along with grapes and a glass of iced tea, this sandwich made the perfect quick, simple and, most importantly, tasty lunch for a busy student like me.

Wednesday, September 7, 2011

Blog Backlog + In the Kitchen: Banana Bread

Dearest readers, I must apologize for my lack of blogging in recent weeks. The start of the school year has been keeping me busy (lame excuse, I know). But I'm back and hope to be posting more in the coming weeks, though my budget and my busy student life may necessitate writing posts less frequently or else broadening the scope of this blog a bit. Since I am currently taking an 'Edible Education' class, taught by Michael Pollan and Nikki Henderson, attended regularly by Alice Waters (I sat two rows behind her yesterday, awesome!), with amazing guest speakers so far, I feel that my thinking about food is shifting and that I am becoming more interested in the food movement and food justice in general. So, maybe a few of my future posts will address this theme, along with my regular restaurant reviews and in the kitchen posts. 


But for now, let me bring you up to date on one my culinary adventures from a few weeks ago. I had just returned from Santa Cruz and had lots of leftover food that was too much for me to eat alone. I recruited Ben and ate Zachary's pizza more frequently than I would like to admit and had been making good progress. But there was one item that I received that I was just not interested in eating: three overly ripe, browning bananas. I found this one item to be so frustrating because I really hate throwing away food, especially when there are others out there who are hungry and I was able to get this for free. (This sentiment has only been reinforced by a recent 'Edible Education' lecture by Carlo Petrini, the founder of Slow Food International, who said that in the U.S. alone, we throw away 22 tons of food a day. Eek!). So it felt wrong to waste these bananas, but it seemed I had no other choice, until Ben suggested that I make banana bread. Such a simple idea had never occurred to me, but as soon as he mentioned it, I was thrilled! This way, I got to use my bananas and eat something delicious, win/win. 


Banana Bread: Waste Not, Want Not. 


We decided to spice our banana bread up a bit with some chocolate chips, and after looking up a recipe, ran down to the store to get some. We returned to Ben's apartment and baked up a banana bread storm, which was much simpler to do than I thought it would be. It was, of course, delicious and the bananas were at the perfect overripeness for making banana bread. We did, however, make the mistake of refrigerating the leftover banana bread, which made it pretty tough when we ate some the next day. While it was still edible, it would have been much more enjoyable had we not done that. Overall, though, I felt triumphant in being able to create something pretty darn tasty out of something I was considering throwing away. 

Wednesday, August 3, 2011

In the Kitchen: A Coupla Summer Salads


Caprese Salad
Salad Shirazi

My high expectations for my blogging this week have been somewhat dampened by the fact that I ate bad eggs earlier this week, and now have some form of food poisoning. I won’t go into too many details (this is a food blog after all), but it has been a frustrating experience for me. Although so far my symptoms have been pretty mild, they have lasted for a few days and I just haven’t been my usual hungry self. In fact, the idea of using adjectives to describe food at this moment in time is not the most appealing one.

With that in mind, I want to keep this post short. I was able to make a few very simple salads before this unfortunate egg incident that were quick to make and yummy to eat. The first was a Caprese salad: mozzarrella, heirloom tomatoes, and basil, with olive oil and balsamic vinegar, salt and pepper. The second was Salad Shirazi, a Persian favorite which consists of tomatoes, cucumbers, and onions, with lemon juice, olive oil, salt and pepper. These two salads are super fresh, super tasty, and perfect for summer. 

 And that is all I have the stomach for right now. Stay tuned for more posts soon (I may just have found a place that can rival Cheeseboard). For now, however, it's time to watch as many Parks and Recreation episodes as is humanely possible for the rest of the day. 

Tuesday, July 26, 2011

In the Kitchen: Santa Barbara Breakfast Blurb


This breakfast brought the sunny-side to a foggy morning in Santa Barbara
Stunning view from our place, a little later in the day.

There isn’t much to say about this little breakfast that I cooked up for myself, other than it felt like the right thing to eat whilst on a family vacation in a beautiful house with a stunning view in Santa Barbara. Though that morning was a rather foggy one, our beach-front house still offered a gorgeous view that inspired me to shake up my usual cereal-and-milk breakfast routine. I saw that my mom had made herself sunny-side up eggs and, since that meal happened to fall within my very limited cooking ability, I decided to do the same, but with a slight twist. After making the eggs, I sprinkled some balsamic vinegar on top, toasted a few slices of sourdough bread, washed myself a nectarine and poured a glass of my favorite caffeinated beverage, Tejava iced tea. It was a wonderful way to wake myself up, and I enjoyed it all the more beside the beautiful environment that surrounded me in stunning Santa Barbara. 

Friday, July 15, 2011

In the Kitchen: Baking, Blueberries, and the Beatles


Baking, Blueberries and the Beatles. That was my and my friend Eliza’s plan for this in the kitchen experience. And, although things did not exactly go as we intended, Eliza and I ended up making some pretty delicious blueberry muffins. After a lovely pizza- and conversation-filled dinner at Zachary’s Pizza, we headed over to Trader Joes and Market Hall to pick up the few supplies that we needed to make this recipe, aptly named “To Die For Blueberry Muffins”.

            When we returned to my place and finally got down to business, we put Abbey Road on my record player and prepared ourselves for a baking frenzy. I turned on my oven only to discover an unfortunate smell of gas. My oven was broken. I was frustrated with myself for not checking to see if my oven was working, especially since I had had problems with it in the past. I thought (logically I might add) that if the oven worked the last time I used it, it would work this time. So I turned off the gas and called Ben, hoping he might be able to help me fix my oven and salvage our evening. Although he couldn’t fix it, he and his roommate (also named Ben) generously offered to let us use their super nice brand new oven.

            So Eliza and I packed up Abbey Road and all the ingredients into a giant bag and trekked over to their place. Baking was so much easier in their kitchen and this only reinforced the importance of having access to good equipment. But I couldn’t have it all. Sadly, Ben’s record player is old and funky and Abbey Road skipped so much that we couldn't keep it on. Although this marked the death of our planned evening, it was probably for the best; Eliza and I were pretty tired at that point and some silence actually did us some good. We were even able to pull it together enough to bake up some super delicious blueberry muffins. The topping was the best part of the muffins by far: a combination of flour, sugar, butter and cinnamon is virtually infallible when it comes to taste. Although Ben (boyfriend) doesn’t like blueberries, he still enjoyed his muffin and Ben (boyfriend’s roommate), Eliza and I all ate ours with gusto. And, not to toot my own horn too much, these muffins received an abundance of compliments when I brought a batch into my internship at Making Contact/NRP.


My lovely co-baker, Eliza.
The Bens, enjoying their milk and muffins.

            Overall, this was just one of those times when a change of plans worked out for the best. Later, I found a potential explanation for our bit of good luck: unbeknownst to us, we baked our blueberry muffins two days after National Blueberry Muffin Day. The stars must have been in alignment or something, because those muffins were superb. 

Monday, July 11, 2011

In the Kitchen: White Wine, Olive Oil, and Garlic Capellini, with Tomatoes and Basil, and Bruschetta

White Wine, Olive Oil and Garlic. Magic Combo!
Bruschetta. Mmmm.

Pasta is a lazy cook’s best friend. And as a lazy cook and an avid eater, I love pasta. Especially the combination of thin, long strand pasta with white wine, olive oil and garlic. Really delicious and hard to screw up, in other words, perfect. Over the weekend, Ben and I decided to make a permutation of this magical mixture, tossing in tomatoes, basil with some capellini pasta. I had also been craving Bruschetta all day, and it made the perfect side dish to our pasta.

We started having absolutely no idea what to cook for dinner, and went to Market Hall for inspiration. Being right around 6 on a Friday evening, it was crowded and the amount of cheeses in that place was completely overwhelming for people who love cheese as much as we do. So, we had to step outside for a little bit to decide and strategize our dinner plans. Melon and prosciutto sounded good, but it seemed like more of a snack than a meal, and in my mind, it didn’t mesh well with my stubborn bruschetta craving. So, we decided to keep it simple and go with pasta, and once we settled on something with the all-powerful combo of white wine, olive oil and garlic, the rest fell into place. We went to Market Hall Produce and got the best-smelling tomatoes and basil I’ve encountered yet, and also picked up an Acme Bread Co. Long Italian Baguette for the Bruschetta at the Pasta Shop.

After a successful shopping trip/decision-making process, we went back to Ben’s place to cook. (He has such a nice kitchen, I must admit, I’m jealous. It’s much bigger than mine, with a brand new stove/oven. Sure, it doesn’t have the same appeal as my cute and ancient stove/oven in terms of character, but trumps my kitchen any day in terms of cooking.) Anyways, it was a pretty quick and easy meal to cook, although we were so hungry by the time we got back that we fumbled with the timing a bit. After prepping the tomatoes, basil and garlic for both the pasta and the bruschetta, all the other steps were last minute, and famished, we had a hard time with it. Eventually, we got everything together, albeit with the pasta slightly cold and the bread slightly overdone (not burnt, but super crunchy), and it was delicious. Despite the problems, it was a yummy meal, with my favorite part of the meal being the Bruschetta I had craved all day, made with olive oil, garlic, basil and tomatoes. To accompany the meal, we had some of the Chardonnay that we used for the pasta sauce, which obviously went well with dinner.
Chardonnay, s'il vous plaƮt?
Overall, it was a meal that highlighted all the good things about the pasta, white wine, olive oil combo, especially the inability to mess it up, which is particularly good for the lazy (or hungry, in our case) cook. 

Thursday, July 7, 2011

In the Kitchen: Southwestern Balsamic Pasta Salad

Southwestern Balsamic Pasta Salad: Finished Product!
I have another confession to make. (Last one, I promise!) For all the love I have for eating and for food, I can’t say that I have the greatest work ethic in the kitchen or that I am the most skillful cook. That’s why, when I cook, I try to keep it simple and work with what I know, making things like…pasta!
            Back in the day, my dad used to make what I’ve termed “southwestern balsamic pasta salad” all the time, and I had a hankering for it the other day. (Fun fact: he has not made it in a while because, apparently none of my siblings enjoyed it as much as I did. Turns out I was the one responsible for eating most of a pasta salad meant for 7 people. But, I digress…) It had been a long day, the summer sun was in full swing and I was tired. All I wanted to was to have this pasta salad in front of me ready to eat.
To make the process of cooking it less daunting, Ben and I headed over to Market Hall, an amazing bunch of little food shops in Rockridge that have the power to turn me into the equivalent of a kid in a candy shop. (And, in case you are wondering, I fully intend to devote an entire blog post to Market Hall.) So, I got some pasta from the Pasta Shop; while tricolor rotini is what my dad uses, I couldn’t find that and decided to experiment with something else. I picked up some form of short cut twisted pasta with fluted ridges, and that would have to do for this meal. We then made our way over to Market Hall Produce and got the lime, cilantro, corn, cherry tomatoes, and shredded parmesan that we needed. I already had some other basic ingredients for this meal sitting at home: black beans, balsamic vinegar, olive oil (or garlic olive oil in my case), and salt.
Ingredients! No measurement, just added everything according to my best judgement and taste.
With all the ingredients in hand, I started cooking the pasta and prepping the produce. Once the pasta was finished, I added: cherry tomatoes (cut in half), corn (cut off the cob), black beans (drained), cilantro (whole leaves), lime juice, the balsamic vinegar/olive oil, shredded parmesan, and salt. We put it in the fridge to chill until I couldn’t wait any longer and, ravenous, I began devouring my meal. It turned out perfect. Just what I was craving on a hot summer day and it had the ideal balance of sweet, tart, and salty flavors. The type of pasta I experimented with for the salad actually worked really well. And, the best part of this whole process was that I made quite a bit, giving me leftovers for a few days and maximizing my time in the kitchen. Needless to say, this meal left me feeling good about my goal to build on my cooking skills, and hopefully, my future kitchen experiences will further bolster my confidence in the kitchen. But for now, I’m satisfied with having done this simple meal right, even when the stakes were high and my energy was low.*

* (That may sound dramatic, but believe me, I was really really really craving it. Also I, have to give credit where credit is due, without Ben’s patience and help, this meal probably would not have come to fruition, so thanks Ben!)